
Let’s create using upcycled or repurposed toys and a fun paint stamping technique.
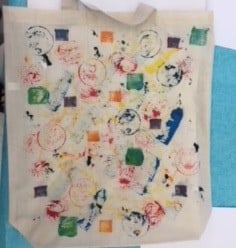
Our Playtime STAMPede project can be done on a paper bag, a reusable tote, cardboard pieces or simply paper. Whatever you choose to paint on, it will be a STAMPede of fun!
While this is a fun activity to do, your child will also build skills. They will explore a variety of art materials and techniques; experiment with pattern, shape and color; develop gross and fine-motor abilities; and improve problem-solving skills. Plus, you will reinforce Kindergarten-readiness skills, such as geometry, inquiry and color identification.
Materials
- Item to be stamped – Suggestions: A paper grocery or lunch bag, an extra cardboard box, a reusable tote (If you plan to wash this bag, you’ll need to use fabric-stable paint or a fixative additive), or thick paper
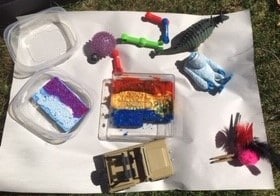
- Tempera paint sponges (See “preparation“ below —These require kitchen sponges, plastic storage containers and paint) to be used as a stamp pad OR puddles of paint on plates
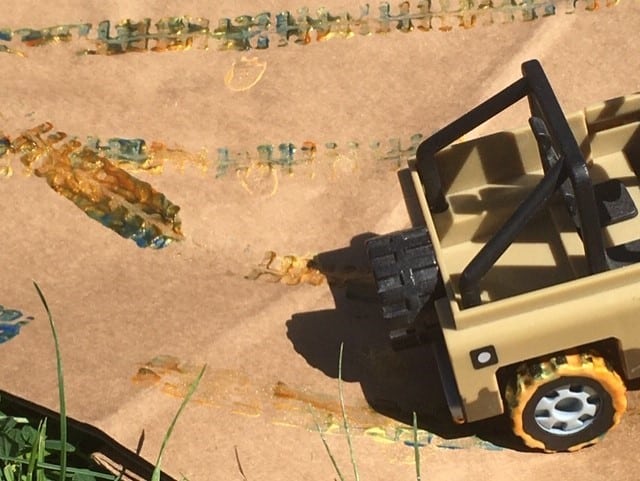
- A variety of toys – Use older, non-porous toys that can get paint on them and be washed
- Extra paper or cardboard to protect your work area
- Smock to protect clothes (optional)
- Dishpan or “Yuck Bucket” for easy cleanup (optional)
FYIs
Through this process art project, you’ll experiment with shapes, enjoy playing through and with art, and even stretch your imagination and critical thinking skills.
- How can you paint without a brush?
- What will the bottom of this block look like as a stamp?
- What kind of tracks could a dinosaur have made?
Note: This activity requires a little bit of set-up before you’ll be ready to paint.
Stamp pad prep
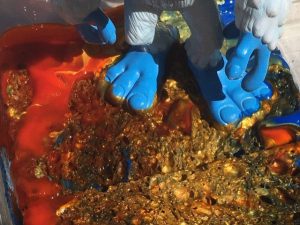
Prepare the paint sponge stamp pads: Using a plastic food storage container (preferably with a lid) and some clean, damp kitchen sponges, you can create stamp pads for whatever paint you’d like to use.
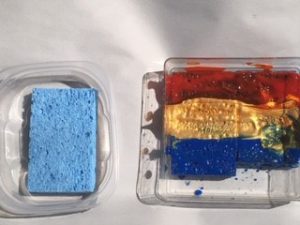
First, place the sponge in the container (cut to fit, if necessary), and then add a small amount of paint. Some of the paint will soak in—this is great! This will allow the paint to evenly coat the surface of the toy used in stamping, without becoming a drippy mess. Refresh with more paint as necessary.
We like to use these paint stamp pads as an invitation to explore color mixing. So, we used striped of red, yellow, blue, black and white all in one container. But mix it up and explore what you and your family prefer.
ALTERNATE OPTION: If you don’t have sponges, simply pour small, shallow puddles of paint onto a sturdy disposable plate. You can then either gently dip the toys in these, or use them to lightly paint the colors onto the toys.
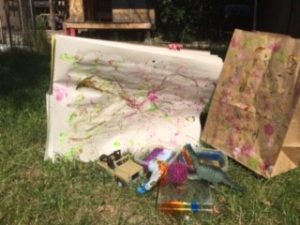
Stamp away…
1. Set out your materials and surface protection. Ensure that your stamping surface is laying flat and smooth. If you’re using a bag, we recommend placing a piece of paper or cardboard inside the bag to keep the paint from seeping through to the back side.
2. Let this be a time of exploration with your family. Wonder aloud about what colors you’ll choose and why. Brainstorm items that can be used as stamps.
- What do you think will happen when you mix the blue and yellow paint? Or the red and white?
- How many different ways can the Lego be used as a stamp?
3. Decide on a toy and paint color. Lightly, evenly press the side of the toy you want to use onto the paint pad. Be sure to check to make sure you got enough paint.
4. Place the paint-inked toy on your fabric (or other material) and press it down firmly and evenly. Lift carefully to reveal your toy stamp shape.
5. Repeat as desired with as many toys and colors you’d like to add to your toy STAMPede!
6. Finally, allow to dry before using.
Cleaning up
A dishpan “yuck bucket” is handy during this activity. All of the toys covered in too much paint (or no longer needed) got put in the dishpan as we went. Then, at the end of the activity, everything else that needed washing got added. It sure made it easy to just take everything over to the sink and give it a quick wash.
If you used the paint sponges as stamp pads and would like to try this activity again, you’re in luck! Simply put the lid on your container, and you’re all set for next time. You don’t have to clean off the sponges, but you may need to add a little fresh paint before you use them again.
Reflection
Questions to think about:
- What will your new art be used for?
- Is it decoration, functional, or both?.
- Does a neighbor need a care package? Or maybe one of your toys needs a sleeping bag or a backpack? Maybe you need a tote for your toys or for snacks for your next adventure?
We did this activity after reading the book, Where’s Tim’s Ted? It’s Time for Bed! by Ian Whybrow.
More questions/suggestions:
- What books about toys do you like to read together?
- What new games are you playing and inventing during this time
- Consider, once in a while, stamping around the room like silly dinosaurs, and get those muscles moving!
It would also work well to talk about a favorite “buddy” they like to snuggle with, how playing can help them feel safe, calm, excited, etc. and how they learn when they play.
- Have they ever lost a special toy?
- What did they do?
- Or, what would they do if they couldn’t find their special toy before bed?
Join us when the museum reopens for more art and literacy projects, as well as Kindergarten readiness activities.
About this project
This activity is from the i.d.e.a. Museum’s Artful Tales Experience program, which combines art and literacy for preschoolers. It was featured during Artful Play! Games & Toys. Learn more about the program on our ATE page.
It was developed by Gallery Educator Monica Broeckling.